This spring, during fitting out, after the boat was launched, we discovered a new and large toilet leak. The blue, treated water was appearing on the mounting surface for the toilet. We checked all of the hose fittings, the pump and valve body and found no leaks. Yet, treated water kept appearing. Further investigation, with a mirror and flashlight. revealed that rear surface of the toilet bowl was wet with treated water and seepage from what appeared to cracks in the bowl itself.
This toilet is the original Wilcox-Crittendon "Headmate" toilet that is now about 36 years old. We obtained a Jabsco compact toilet as a replacement. This Jabsco toilet has comparable dimensions to the W-C and should fit in the same space. It also has all of the same-sized hose fittings that are in same locations as the old toilet.
We then proceeded to remove the old toilet. After removal, we could the get a good view of failed surface of the toilet bowl. This picture shows the evidence of multiple cracks in the rear part of the bowl.
The root cause of these cracks has not been determined. A Google search did not yield any clues as to the cause of these cracks. They appear be related to some form of water-related freezing. It seems to as if the water penetrated the glazed surface of the bowl and then froze, causing the cracking. We are continuing to investigate the probable cause of these cracks.
The new Jabsco toilet fit easily in about the same position as the old one. Installation did involve plugging of the old mounting holes and the drilling of new ones to fit the new base. All of the old hose connections were re-used for the new toilet.
This picture shows the new toilet in position, with a picture of the old toilet on the seat cover.
Thursday, May 14, 2015
Tuesday, February 10, 2015
When the #1 Genoa is up, we have been annoyed by having to steer off course, take a look for traffic and then return to our course. This picture shows how the view ahead is partially blocked by the sail.
We have had the #1 Genoa re-cut to raise the clew 3 feet. The local Doyle Sails shop did this for a very reasonable cost. We had the clew raised to improve our forward visibility while sailing close hauled. The lower section of the sail that was removed should not have a large effect on performance because that section was partially distorted by the life lines and was mostly, fluttering in the breeze.
We will provide an up date after we fly the sail in the spring.
As promised, here is the up date:
We did have some good weather to check out the #1 Genoa with lower panel re-cut to raise the clew about three feet. As you can see in the new, eye level, photo, visibility forward has been greatly improved. we did not notice any large degradation in performance from the approximately 8% reduction on sail area. The noticeable improvement in sail shape may have compensated.
We have had the #1 Genoa re-cut to raise the clew 3 feet. The local Doyle Sails shop did this for a very reasonable cost. We had the clew raised to improve our forward visibility while sailing close hauled. The lower section of the sail that was removed should not have a large effect on performance because that section was partially distorted by the life lines and was mostly, fluttering in the breeze.We will provide an up date after we fly the sail in the spring.
As promised, here is the up date:
We did have some good weather to check out the #1 Genoa with lower panel re-cut to raise the clew about three feet. As you can see in the new, eye level, photo, visibility forward has been greatly improved. we did not notice any large degradation in performance from the approximately 8% reduction on sail area. The noticeable improvement in sail shape may have compensated.Friday, December 26, 2014
Thursday, December 18, 2014
General Information
Background
Our boat is a 1979 Columbia 8.3 meter sloop that we purchased in 1987. The name that came with the boat is La Yu which is usually translated as "hot sauce", a peppery sauce. We kept the name and proudly display it on the transom.
Background
Our boat is a 1979 Columbia 8.3 meter sloop that we purchased in 1987. The name that came with the boat is La Yu which is usually translated as "hot sauce", a peppery sauce. We kept the name and proudly display it on the transom.
Interior Arrangement
These views of the interior of our 1979 Columbia 8.3 are from the company sales brochure. They should assist the reader in orientation for the various items that are described. Some details in the plan have been revised to reflect the changes that we have made in the head, saloon and galley areas.
We bought this boat in 1987. It had been well maintained by the first owner and we had no big issues with boat. The fact that this boat has always been in fresh water and our limited sailing season in Michigan have kept this boat young. Slowly, we began to notice things that needed attention or could stand improvement.
“there is nothing. absolutely nothing that half so much is worth doing as messing about in boats”
Kenneth Grahame
Wind in the Willows
Wednesday, April 23, 2014
Re-relocation of the Batteries to Starboard (Nov 2013 - April 2014)
We had noticed for some time that the boat had small “list” to port. We partially corrected this by keeping the fresh water tank nearly full. We attributed most of the list to the fact a majority of the heavier equipment is located to port. This includes the head, holding tank, stove and batteries. We reviewed various options for equipment that might be easily moved from port to starboard as well as fit in the available space on the starboard side. The batteries were found to be the best candidate. There was some under utilized space beneath the starboard cabin settee. We measured the space and found that if we pushed the fresh water tank forward approximately twenty inches, there would be just enough space to accommodate the two batteries. This space is located forward of the galley sink, below the settee cushion bunk board and along the face of the settee facing.
This picture shows the relocated water tank, battery and tool space. There is a new bulkhead between the aft end of the tank and the battery-tool area. The athwartship aluminum stringer, which consists of two angles that are riveted together, is to support the bulkhead as well as the bunk boards.
This next picture is a close up of the finished battery and tool space. This also shows the fore and aft, aluminum stringer that supports the small bulkhead between the battery and tool spaces.
This picture shows the modified bunk boards, before painting. The middle access cover is for the water tank inspection and fill port. The two, aft, access covers are for the battery and tool spaces.
This project did meet the goal of curing the list-to-port. Moving over one hundred pounds of equipment about four feet to starboard did have a significant effect. Also, we gained a tool storage space that moves the tools to starboard at least a foot. We have yet to use the storage space that we gained in the “old” battery compartment.
{Lessons learned:
- Careful measurements and mockups, with full size pieces, like cardboard batteries, save much of the “cut twice” phenomenon.
- Take the effort to get exact dimensional data for the parts that you plan to use. We obtained detail drawings from attwood Marine Products, for the battery trays.
- We were fortunate in gaining a new spot for the tools that is secure, easy to access and moves the weight to starboard.}
Tuesday, July 20, 2010
Remote Dipstick for Engine (July 2010)
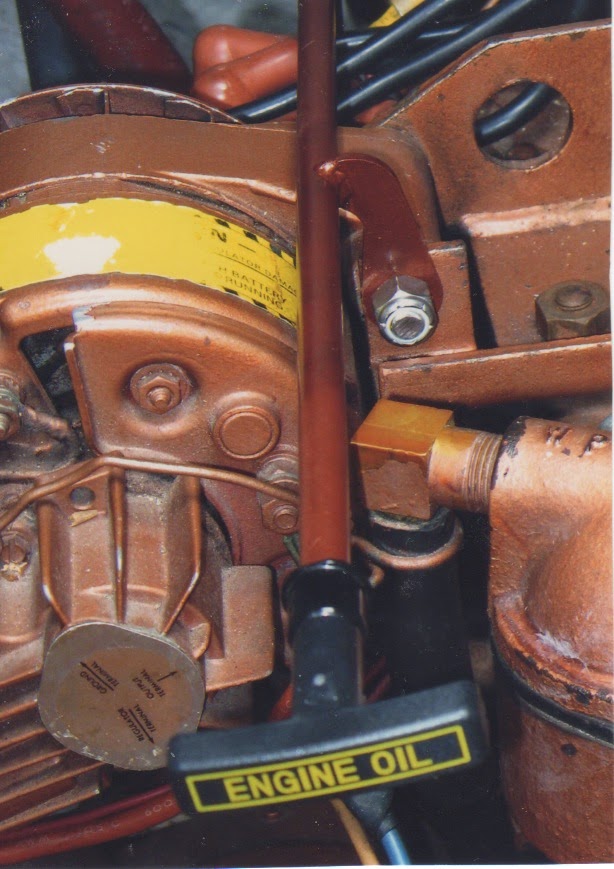
Moyer Marine announced that they were selling a new remote dipstick kit for the Atomic Four. We decided that it was worthwhile to acquire and install this kit. The kit includes a long tube, with bracket, and a new dipstick with a handle, marked “engine oil”. The tube fits over the original dipstick tube and the bracket fits under a fastener for the alternator. It was easy to install and use. It eliminates the long reach over the engine and searching for the old dipstick tube.Monday, June 15, 2009
Fold down Tool Tray in Engine Compartment (June 2009)
It seems that whatever job there is to do in the engine compartment it takes many tools. There is no place to put them and they keep dropping and hiding. We made a small, fold down tray for the starboard wall of the compartment.
The picture on the left shows it in use with a few tools. There is a foam rubber pad banded to the bottom of the tray to stop the tools from sliding around. In the right hand picture, the tray is folded up and out of the way. The engine compartment removable shelf is in place for this picture. The tray has plastic, ball type, friction latch to hold it in the up position. This has proven itself to be quite handy while work is being done.
Subscribe to:
Posts (Atom)