Showing posts with label Propulsion. Show all posts

Tuesday, July 20, 2010

Remote Dipstick for Engine (July 2010)


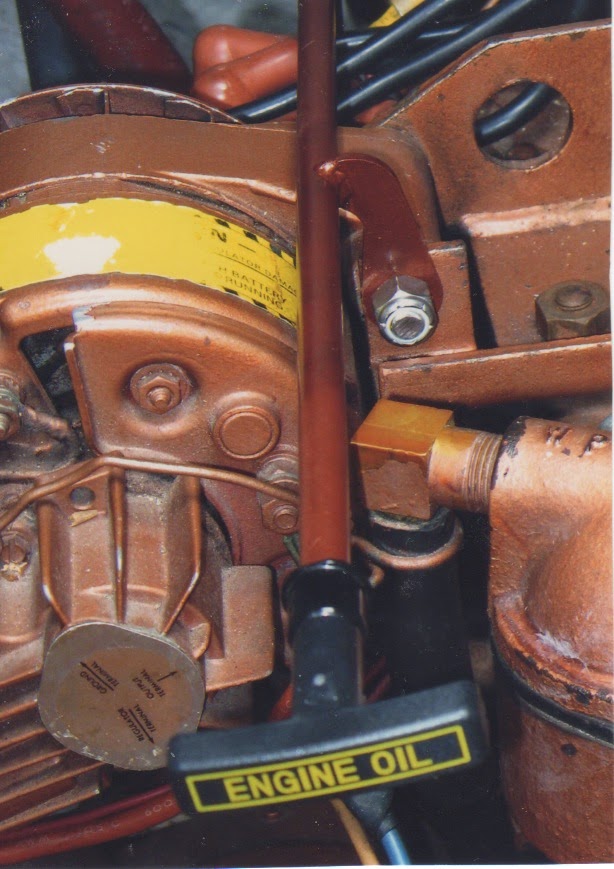
Moyer Marine announced that they were selling a new remote dipstick kit for the Atomic Four. We decided that it was worthwhile to acquire and install this kit. The kit includes a long tube, with bracket, and a new dipstick with a handle, marked “engine oil”. The tube fits over the original dipstick tube and the bracket fits under a fastener for the alternator. It was easy to install and use. It eliminates the long reach over the engine and searching for the old dipstick tube.


Monday, June 15, 2009

Fold down Tool Tray in Engine Compartment (June 2009)


It seems that whatever job there is to do in the engine compartment it takes many tools. There is no place to put them and they keep dropping and hiding. We made a small, fold down tray for the starboard wall of the compartment.

The picture on the left shows it in use with a few tools. There is a foam rubber pad banded to the bottom of the tray to stop the tools from sliding around. In the right hand picture, the tray is folded up and out of the way. The engine compartment removable shelf is in place for this picture. The tray has plastic, ball type, friction latch to hold it in the up position. This has proven itself to be quite handy while work is being done.


Tuesday, April 25, 2006

Engine Water Pump (Jun 2005))


Replaced the original Oberdorfer pump with a new one in March 1991.  This was the old style pump with a grease cup that required  turning the cap a quarter turn each time that we set sail. Shaft and seals of this "new" pump were replaced in June 2001.


In 2005, Moyer Marine introduced an improved water pump (Model MMI 502) which did not
require a grease fitting for lubrication. This new pump, installed on 25 May 2005, mounts in the same location as the original. There is no grease cup and the rear cover is easily removed by rotating thumb screws. Cover removal allows easy access to the impeller and drains the pump for winter storage.
Sorry to say, this pump (#1), began to leak engine oil from the seal area on 12 Jun 2005. We put the old pump in its place and contacted Moyer Marine and they provided a replacement (#2) which was installed on 17 Jun 2005. This second, new, pump, which, according to Moyer, had a secondary oil seal, began to leak engine oil, in the same place, early in April, 2006. We again contacted Moyer Marine. They shipped us pump #3 which was installed around 22 Apr 2006. This pump #3 has performed well and the new features make it a pleasure to own. Moyer asked that pump #2 be returned to them so that they could do an investigation. This was done and they provided a report which stated that pump #2 was, mistakenly, the same version as Pump #1. We seemed to have helped Moyer Marine Inc. to overcome the teething problems with this new pump.


{Lesson learned:
Always take the time, cost and effort involved to keep the water pump operating well. The engine is totally dependent on it's operation.}
Wednesday, May 27, 1998

Fuel Tank (May 1998)

We had a scary night in May when we discovered that the original, steel fuel tank was dripping gasoline into the bilge. Fortunately, we were safe in our boat well. We went and bought some gasoline jugs and pumped the fuel into them from the inlet fitting of the fuel tank. Later, we emptied the jugs into the fuel tank of our vehicle. The fuel tank is located below the cockpit sole in one of the least accessible areas of the boat. We managed to disconnect the fuel and vent lines and the straps that secured to tank. We removed the tank to a safe place and finished draining fuel into the jugs. Most of this effort was completed in the dark of night under the light from a flashlight. We were concerned, properly, that any lights that we turned on might cause a big explosion. We soaked up the remaining fuel in the bilge. We left boat to “air out” for a while, thankful that it had not blown up. The next day, we found that the root cause of the leak was a rusted through weld seam on the end of the fuel tank.

We searched and located, at Boat US, an 18 gallon, rotationally molded, polyethylene fuel tank that fit the available space below the cockpit. This tank has fittings and a fuel gage sender that matched those on the old tank. This made installation a lot simpler. We adapted the mounting area to accept this tank used a set accessory hold-down brackets to retain the tank. Acquisition, Installation and testing of the new tank was completed within 10 days. This picture shows the connections to the new tank.


Thursday, March 13, 1997

Engine Oil Filter (March 1997)

The original Atomic 4, was not equipped with an oil filter. Indigo Electronics made available a by-pass- flow oil filter kit, #AT-4F, for this engine. We obtained and installed this kit and have been satisfied with its performance. In our usage the oil stays clean for a complete season. We change the oil and filter yearly, even though it may not be required.


Saturday, November 18, 1995

12 X 6 Two Blade Propellor Replaced with a Two Blade Campbell Sailor Propellor (November 1995)


The Campbell Sailor design features a cupped blade that is wider near the tip. They claim that forward thrust is improved and reverse thrust is very much improved. We found this to be the case and have been very happy with the performance of this propellor.


Saturday, May 22, 1993

The Great Muffler Mystery (May 1993)

From the time that we purchased the boat, 1987, the engine seemed to run rougher than expected and after a sail that involved significant heeling, the engine would be hard to start. On these occasions, we would find the engine oil to be “milky” (we found out later that this meant that there was water in the oil). We would change the oil and the go on to repeat the process many times. At one point, we thought that the cylinder head gasket was leaking and went through the trouble to, needlessly, replace it.
It was not until 1993 that we found the root cause of the problem! We had an occasion to examine the forward end of the Vernalift muffler. We saw the word “outlet” printed on it. At that point we realized that the muffler had been installed backwards at the time the boat was built. This caused water to collect and return through the engine exhaust manifold and valves into the crankcase when the boat was heeled. We reversed the muffler so that the engine exhaust went in the inlet and and the water/exhaust-gas combination went out the outlet. Problem solved: the engine runs smoother and we have not had water in the engine oil since that time. Just a shame that it took fourteen years to solve the mystery.

The view on the left, from a Columbia Yacht Corp. drawing, shows the correct routing for the engine exhaust. The drawing also shows the internal parts of the Vernay waterlift (#7) with the inlet pipe in the correct position. This helps to explain why the engine ran roughly. The exhaust is under water with the muffler reversed. The photo on the right is of the forward end of the waterlift after we reversed its position in the boat. This view shows the inlet, engine, side of the muffler.


Sunday, January 20, 1991

Drivesaver Coupling (January 1991)


This coupling was installed to reduce engine/drivetrain roughness. It turns that the root cause of the “roughness” was discovered later. See The Great  Muffler Mystery (5/1993). The coupling consists of a soft plastic disc that is bolted to the engine flange. The disc has captive nuts to accept the bolts that are inserted through the driveshaft flange. This isolates the engine and driveline vibrations.

This coupling did reduce the roughness somewhat and is still in use on the boat.


Wednesday, May 24, 1989

Carburetor (May 1989)


We struggled with small leaks for some time. This included replacement of the float valve and numerous gaskets. Frustrated, we had the carburetor rebuilt by a local service shop which cured the problem for a long time. A small leak, in July/2000 and September/2001, was repaired, at no cost, by the same shop. It is still performing well.

Monday, April 10, 1989

Fireboy Halon Fire Extinguisher (April 1989)


We installed this extinguisher and it is still in the engine compartment. It has a temperature sensitive valve that will operate to discharge the unit in case of a fire. Halon was later banned and these devices are no longer available. I was concerned if would still work. So we contacted Fireboy. They advised us t to have the unit weighed and check the weight against the data on the unit label. If the weight is correct, the unit is still functional. In December 2014, we had the unit weighed on an official scale and it still weighs the correct amount. It is still installed in the engine compartment. Fireboy also provided documentation of the unit suitability for service.